Physical Computing - TouchSensor, Photoresistor, and Thermistor

Adam Boucek
|October 11th 2023
In this lab, we will continue with another set of projects you can create with ESP32-WROVER. Instructions are given by Andrew J. Park, Ph.D..
We will use Freenove Ultimate Starter Kit for ESP32-WROVER which you can buy on Amazon. How to set up the kit and start uploading code you can find on Freenove.
If these projects seem too challenging, you can do the Freenove tutorials. See them in the tutorials section ↓.
Project 1 - TouchSensors & LED Bar
Date: 10/08/23
Instructions:
Design and construct a circuit with a buzzer, seven LEDs, jumpers, and other necessary electronic components. Seven jumpers are connected to several GPIO channels as capacitive touch pins. Each jumper represents each musical tone of the seven tones (do, re, mi, fa, sol, la, and si). Each jumper is also connected to a LED. When one of the jumpers is touched, it plays its musical tone, and its corresponding LED is lit. Capture your settings and working circuit in photos and videos (the videos should include sound).
Parts:
- ESP32-WROVER x1
- GPIO Extension Board x1 (optional)
- Breadboard x1
- Jumper M/M x18
- LED Bar 1x
- Passive Buzzer 1x
- NPN transistor x1
- Resistor 220Ω x7
- Resistor 1kΩ x1
TouchSensors & LED Bar Schema:
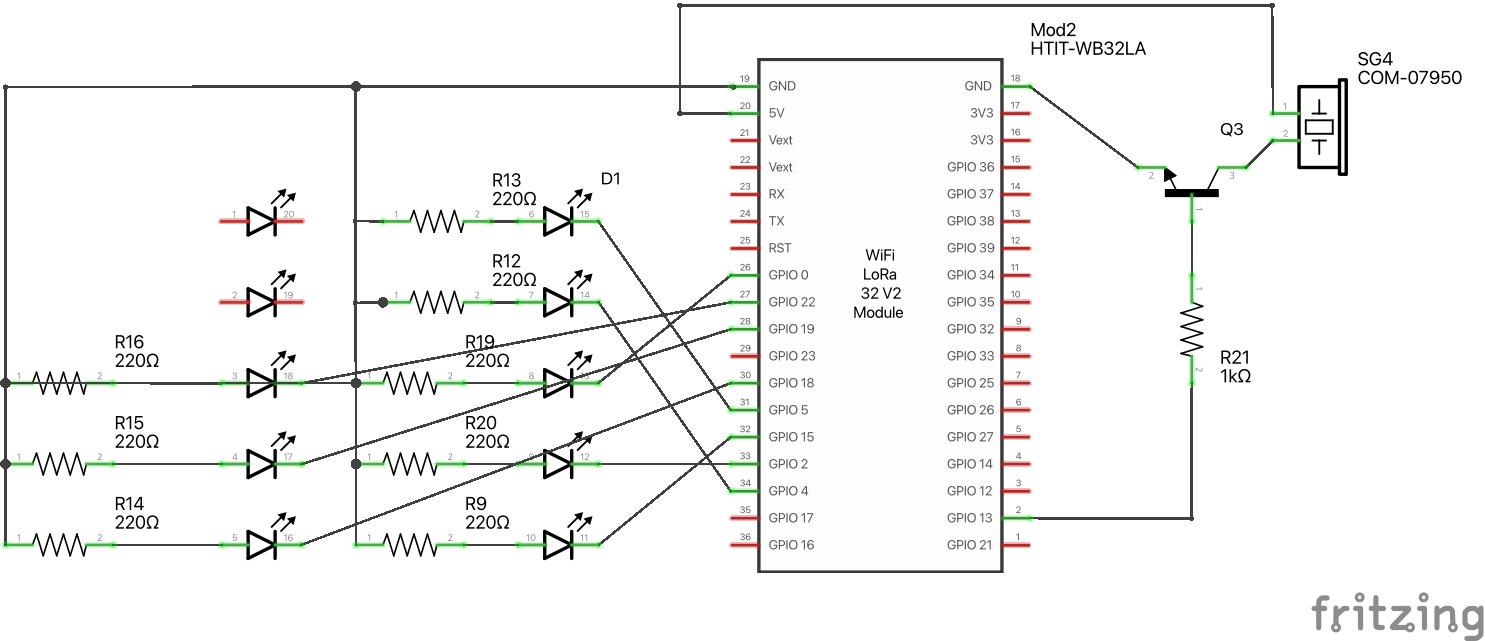
Note: I was not able to illustrate jumpers connected to nothing. So they are missing in this illustration.
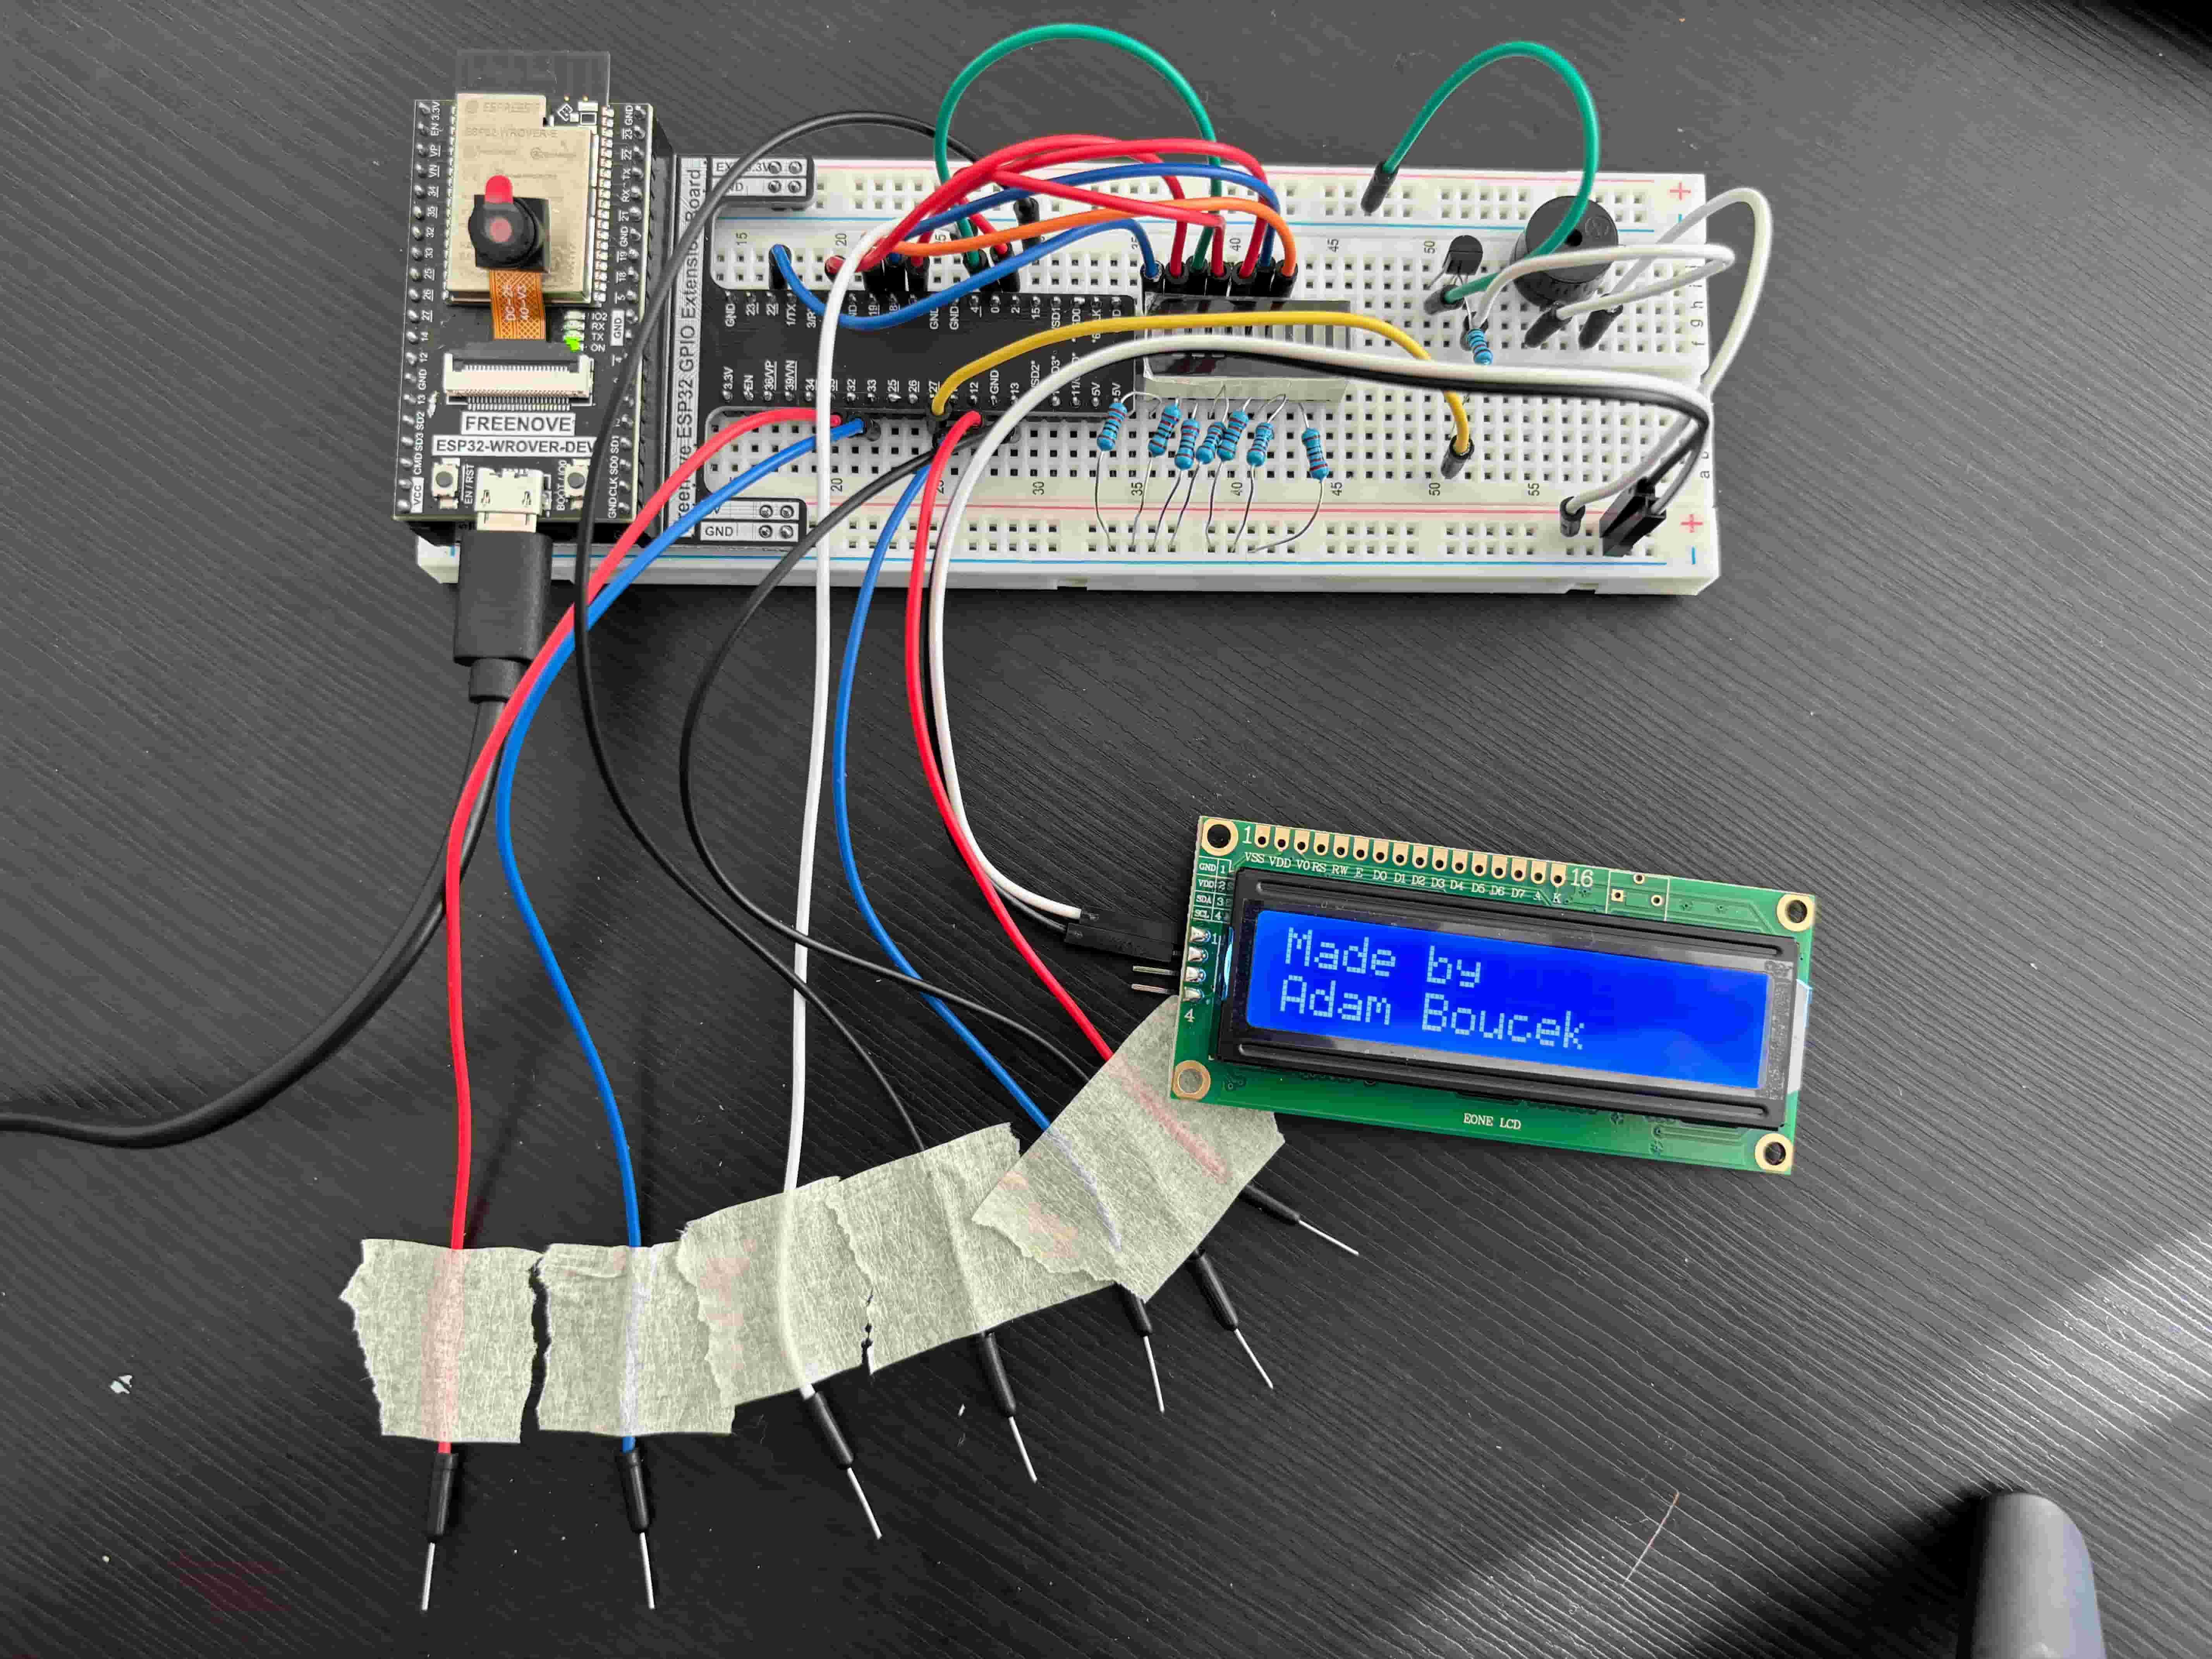
TouchSensors & LED Bar Breadboard View:

Source Code:
project-1.py
from machine import TouchPad, Pin, PWM
import time

# Defining note frequency
NOTE_A = 440
NOTE_B = 494
NOTE_C = 262
NOTE_D = 294
NOTE_E = 330
NOTE_F = 349
NOTE_G = 392

tpA = TouchPad(Pin(32,Pin.IN,Pin.PULL_UP))
tpB = TouchPad(Pin(33,Pin.IN,Pin.PULL_UP))
tpC = TouchPad(Pin(4,Pin.IN,Pin.PULL_UP))
tpD = TouchPad(Pin(15,Pin.IN,Pin.PULL_UP))
tpE = TouchPad(Pin(14,Pin.IN,Pin.PULL_UP))
tpF = TouchPad(Pin(13,Pin.IN,Pin.PULL_UP))
tpG = TouchPad(Pin(12,Pin.IN,Pin.PULL_UP))

notes = [NOTE_A, NOTE_B,NOTE_C, NOTE_D, NOTE_E, NOTE_F, NOTE_G]
ledPins = [22, 21, 0, 2, 5, 18, 19]
notePins = [tpA, tpB, tpC, tpD, tpE, tpF,tpG]
passiveBuzzer = PWM(Pin(13), 2000)
isPressed = 0

while True:
    for i in range(len(notePins)):
        if notePins[i].read() < 200: # when the sensor is pressed
            passiveBuzzer.init()
            passiveBuzzer.freq(notes[i])
            led = Pin(ledPins[i], Pin.OUT)
            led.value(1)
            time.sleep_ms(200)
            led.value(0)
            isPressed = 1
        if notePins[i].read() > 300: # when the sensor is released
            if isPressed:
                isPressed = 0
                time.sleep_ms(100)
        time.sleep_ms(100)
        passiveBuzzer.deinit()
Youtube video ↓ (click on it)

Project 2 - LED, Photoresistor, and Buzzer
Date: 10/08/23
Instructions:
This project is about designing and constructing a circuit to help you wake up in the morning. Use a LED, a NeoPixel module, a buzzer, a photoresistor, a button, and other necessary electronic components. When it is dark, just the LED is lit (probably with dim light because you need to sleep well). When it is bright, the NeoPixel module blinks all the LEDs fast at random, and the buzzer makes loud and crazy sound until the button is pressed (when the button is pressed, all the LEDs stop blinking, and the buzzer stops making any noise.) Capture your settings and working circuit in photos and videos (the videos should include sound).
Parts:
- ESP32-WROVER x1
- GPIO Extension Board x1 (optional)
- Breadboard x1
- NeoPixel Ring 8 RGB LEDs x1
- Jumper M/M x12
- LED x1
- Photoresistor x1
- NPN transistor x1
- Push buttons 1x
- Resistor 220Ω x1
- Resistor 1kΩ x3
- Resistor 10kΩ x1
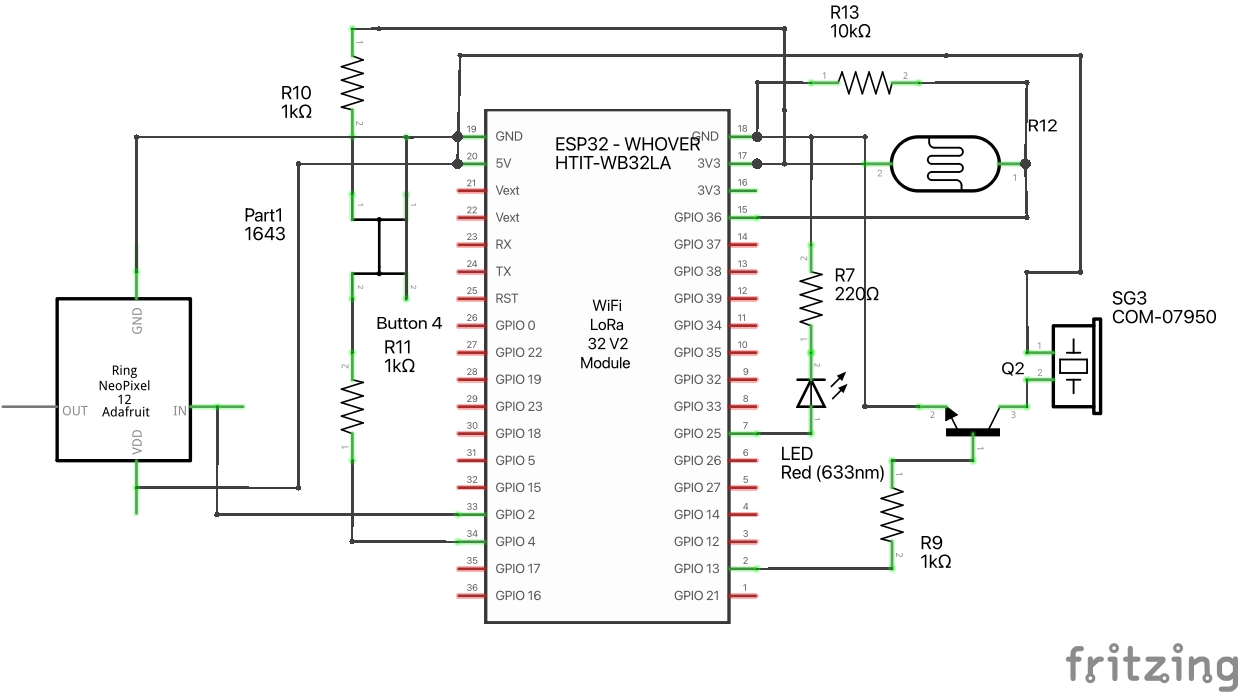
LED, Photoresistor, and Buzzer schema:
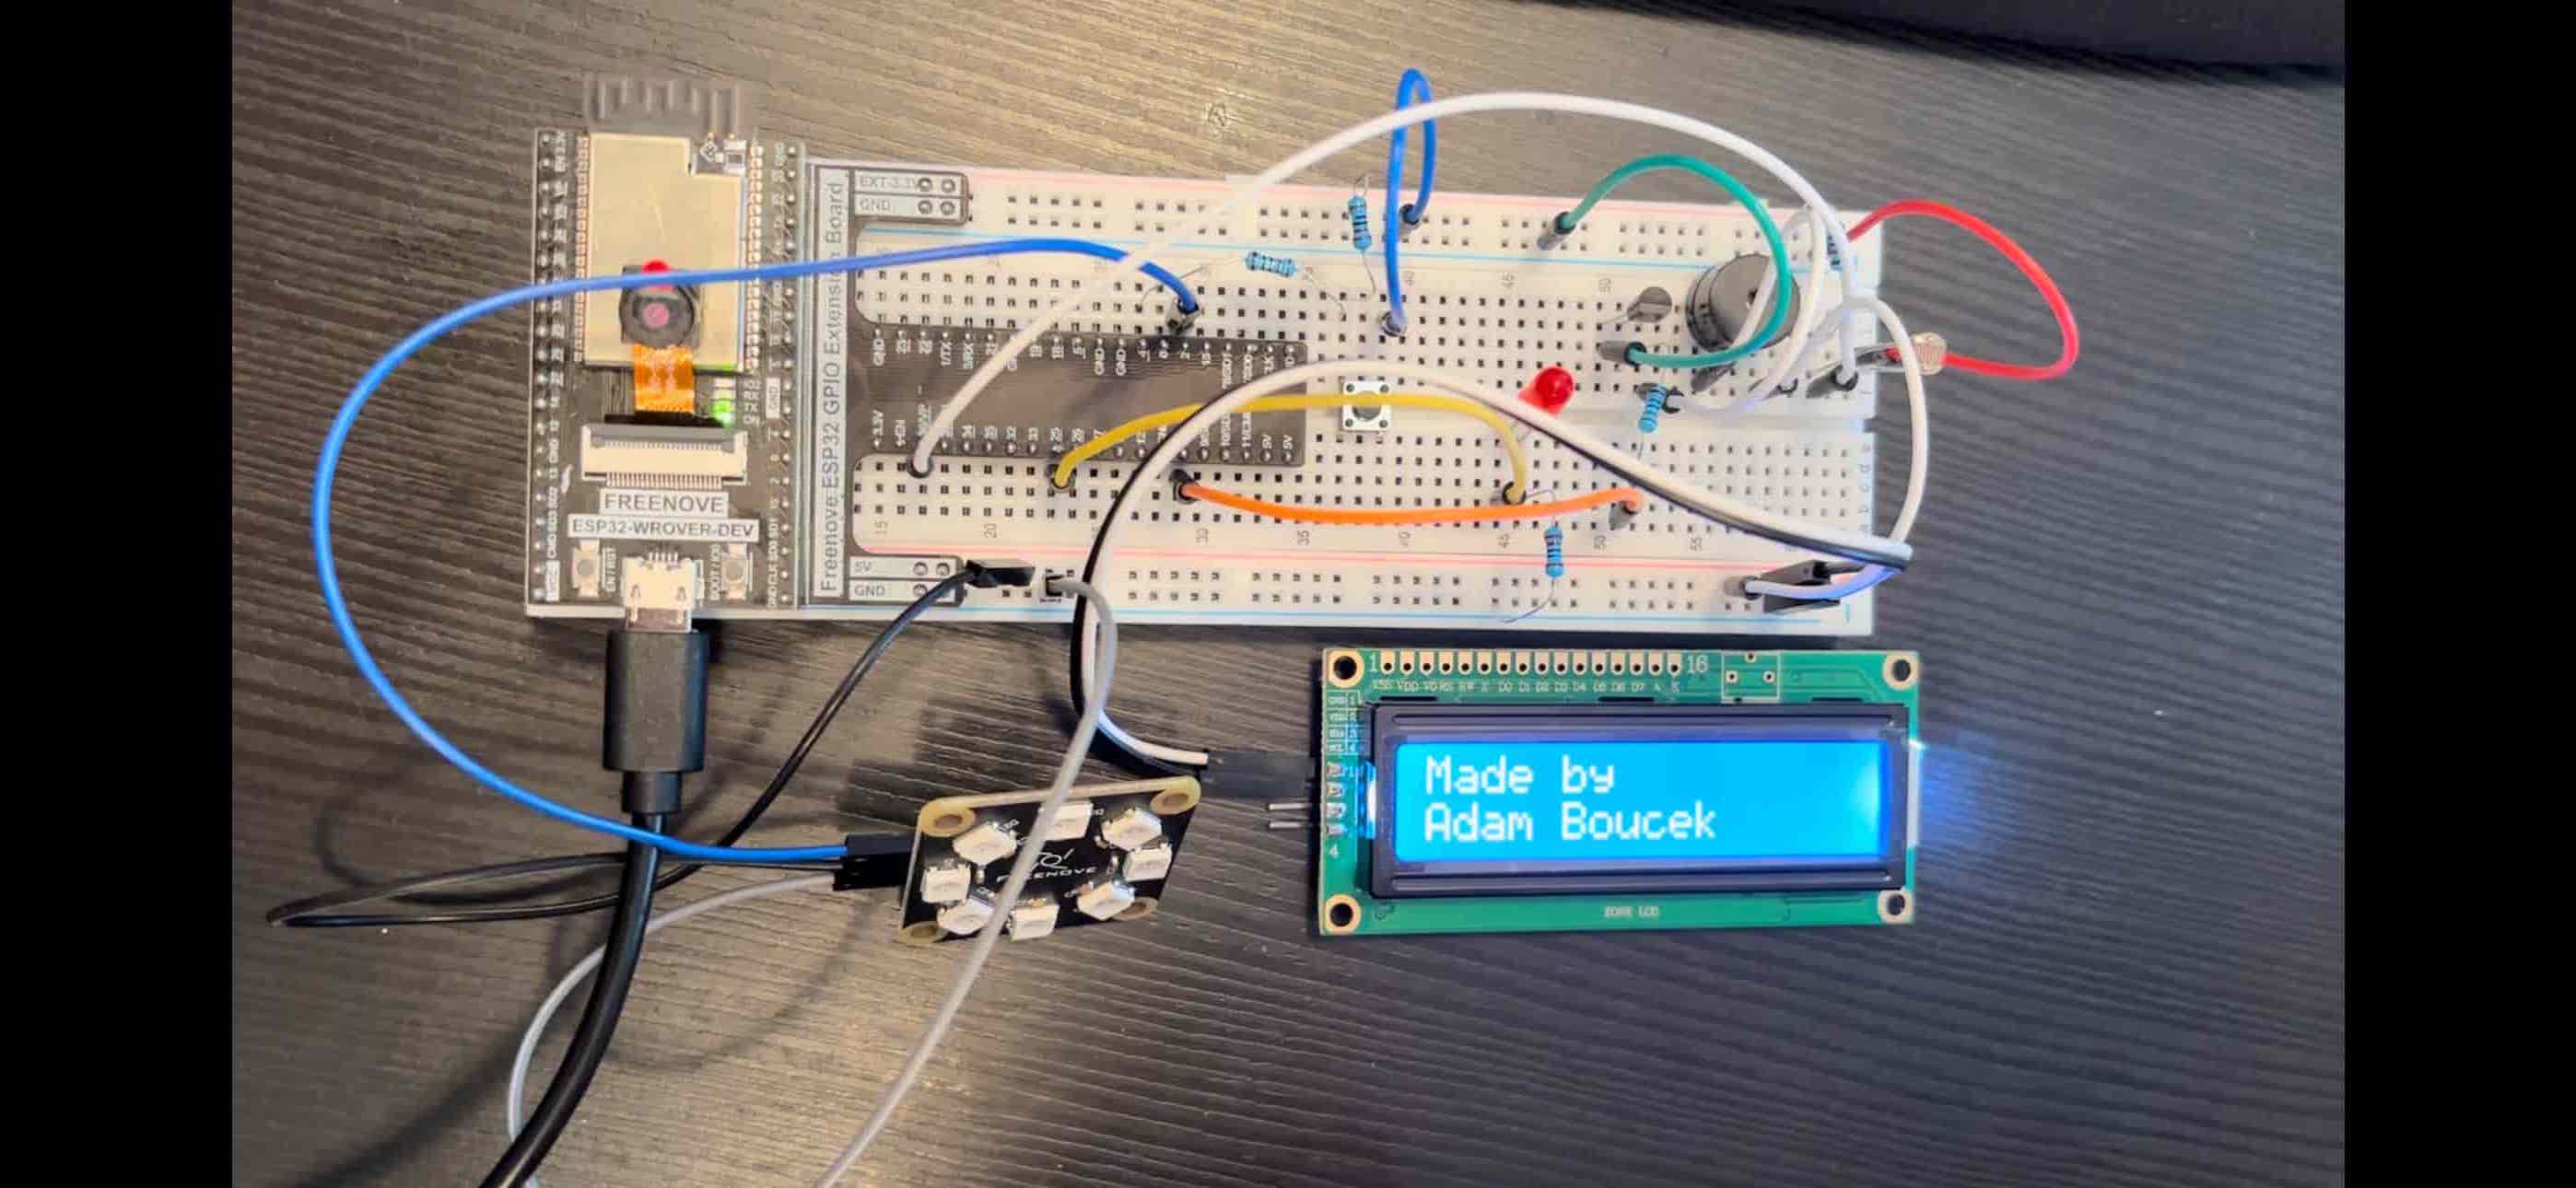
LED, Photoresistor, and Buzzer Breadboard View:
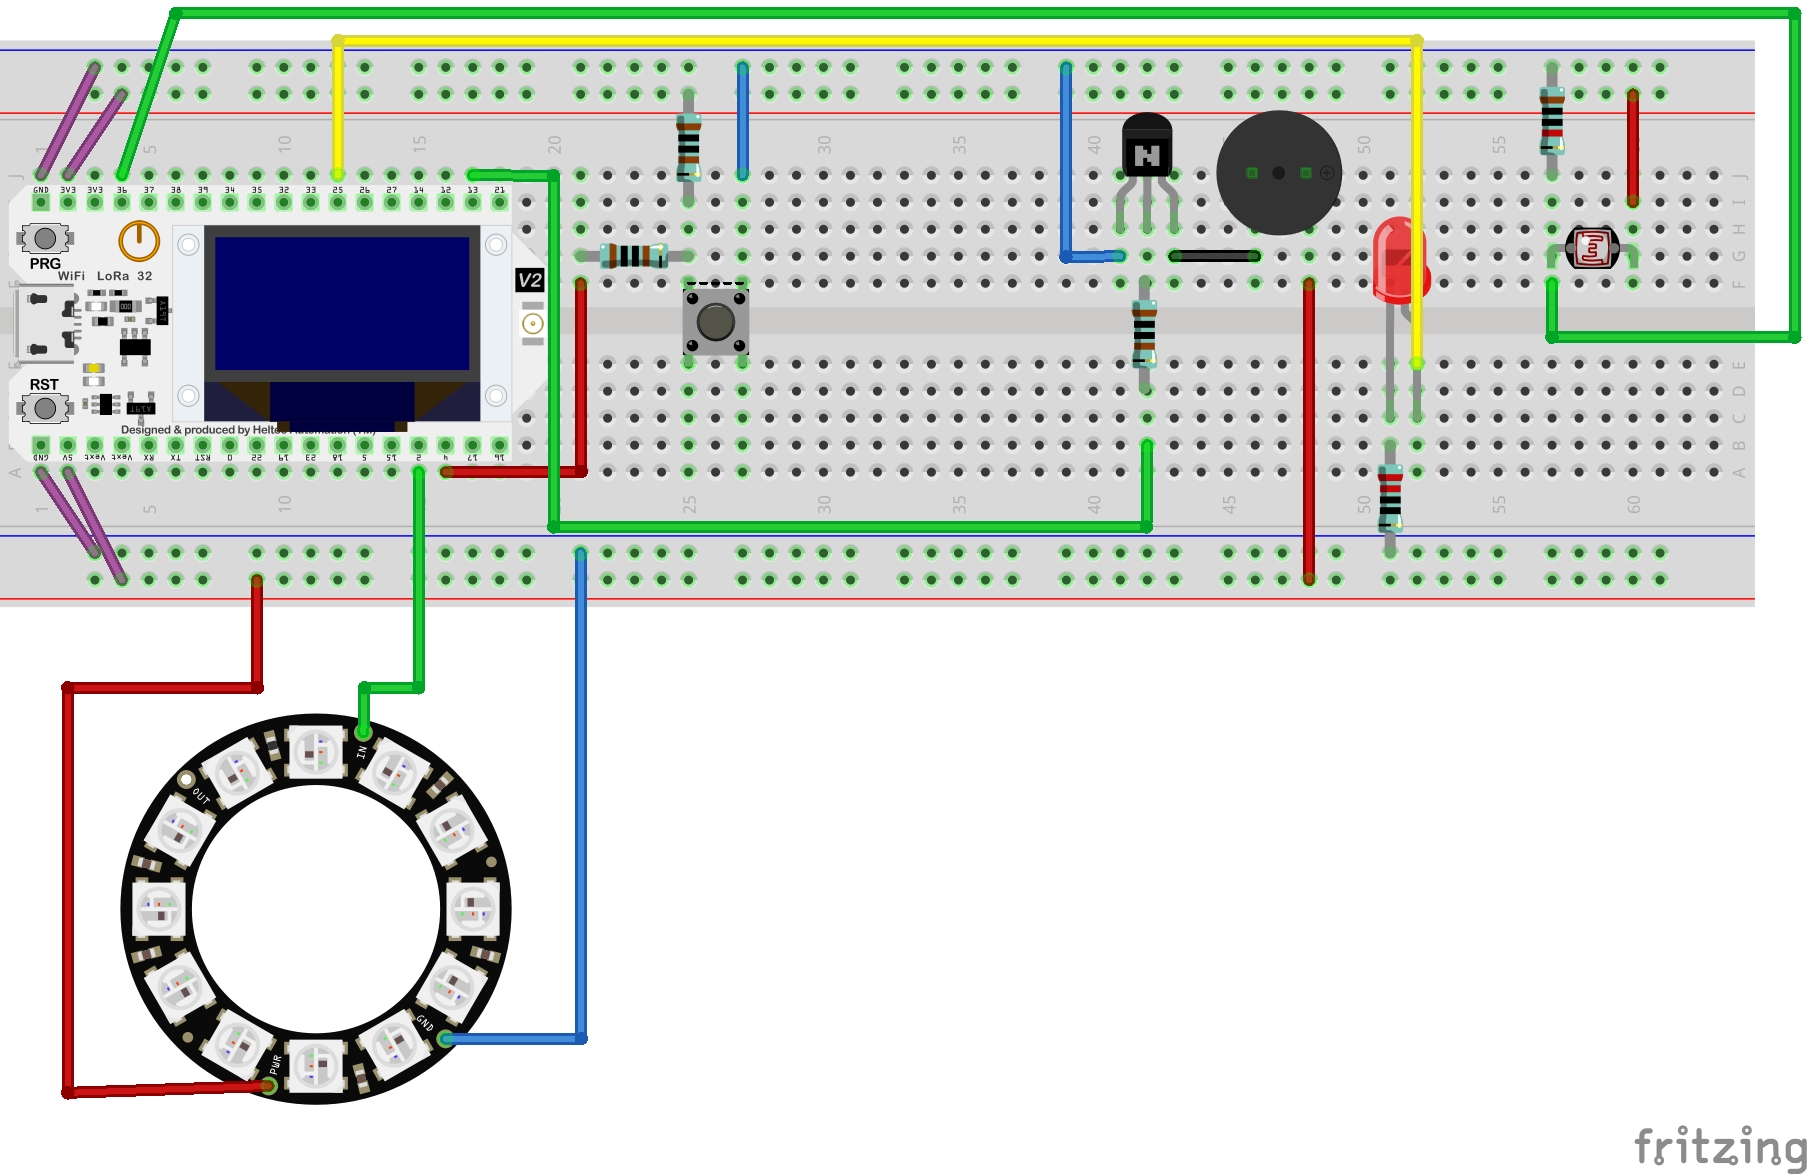
Note: Fritzing does not have NeoPixel Ring 8 RGB LEDs but it includes 12 LEDs ring. Please ignore this fact.
Source Code:
project-2.py
from machine import Pin, PWM, ADC
import math
import time
import neopixel
from random import randint

pwm = PWM(Pin(25, Pin.OUT), 10000)
adc = ADC(Pin(36))
adc.atten(ADC.ATTN_11DB)
adc.width(ADC.WIDTH_10BIT)

PI = 3.14
button = Pin(4, Pin.IN, Pin.PULL_UP)
passiveBuzzer = PWM(Pin(13), 2000)

pin = Pin(2, Pin.OUT)
np = neopixel.NeoPixel(pin, 8)

brightness = 0.02  # brightness: 0-1.0
red = 0  # red
green = 0  # green
blue = 0  # blue

isAlarmOn = True

def wheel():
    global red, green, blue
    red = int(randint(0, 1023)*brightness)
    green = int(randint(0, 1023)*brightness)
    blue = int(randint(0, 1023)*brightness)

def neo():
    wheel()
    colors = [[red, green, blue], [0, 0, 0]]
    for i in range(len(colors)):
        for j in range(0, 8):
            np[j] = colors[i]
            np.write()
        time.sleep_ms(100)
    time.sleep_ms(10)


def alert():
    for x in range(0, 36):
        sinVal = math.sin(x*10*PI/180)
        toneVal = 2000+int(sinVal*500)
        passiveBuzzer.freq(toneVal)
        time.sleep_ms(10)


passiveBuzzer.deinit()
try:
    while True:
        adcValue = adc.read()

        print(adcValue)
        if adcValue > 250: # when the it's dark LED is on and dimmed
            pwm.duty(128)
            time.sleep_ms(1)
            isAlarmOn = True # set the alarm ready when there is light
        if adcValue < 250 and isAlarmOn: # goes off when it's bright and the alarm is set on
            pwm.duty(0)
            neo() # run random neo LED colors
            passiveBuzzer.init()
            alert() # run buzzer
        if not button.value(): # button turns it off until it's dark again
            isAlarmOn = False
            passiveBuzzer.deinit()
            time.sleep_ms(100)
        else:
            passiveBuzzer.deinit()
        time.sleep_ms(100)
except:
    pwm.deinit()
    passiveBuzzer.deinit()
Youtube video ↓ (click on it)
Tutorials
To move forward I can show you what cool things you can make with the Freenove tutorials. They are well-guided and a lot of fun.
| Tutorial No. | Gif |
|---|---|
| 10.1 |  |
| 10.2 |  |
| 11.1 |  |
| 11.2 |  |
| 11.3 |  |
| 12.1 |  |
| 13.1 |  |