Physical Computing - Joystick, 74HC595 & LED Bar Graph, 7-Segment Display, and LED Matrix

Adam Boucek
|October 19th 2023
In this lab, we will continue with another set of projects you can create with ESP32-WROVER. Instructions are given by Andrew J. Park, Ph.D..
We will use Freenove Ultimate Starter Kit for ESP32-WROVER which you can buy on Amazon. How to set up the kit and start uploading code you can find on Freenove.
Project 1 - Joystick, 74HC595 & 7-Segment Display
Date: 10/08/23
Instructions:
Design and construct a circuit with a joystick, a buzzer, a 4-digit 7-segment display, a 74HC595, and other necessary electronic components. At the beginning, there is no message on the 4-digit 7-segment display. When you press the joystick down vertically (it is like a button), the 4-digit 7-segment display shows a message. When you push the joystick to the right, the 4-digit 7-segment display shows the message moving from the left to the right with some sound effects (s1) continually (going around). When you push the joystick to the left, the same message crosses from the right to left over the display with different sound effects (s2) continually (going around). When you push the joystick down, the message scrolls down with sound effects (s3). When you push the joystick up, the message scrolls up with sound effects (s4). Capture your settings and working circuit in photos and videos (the videos should include sound).
Parts:
- ESP32-WROVER x1
- GPIO Extension Board x1 (optional)
- Breadboard x1
- Jumper M/M x18
- 74HC595 x2
- Joystick 1x
- Active Buzzer 1x
- NPN transistor x1
- Resistor 220Ω x7
- Resistor 1kΩ x1
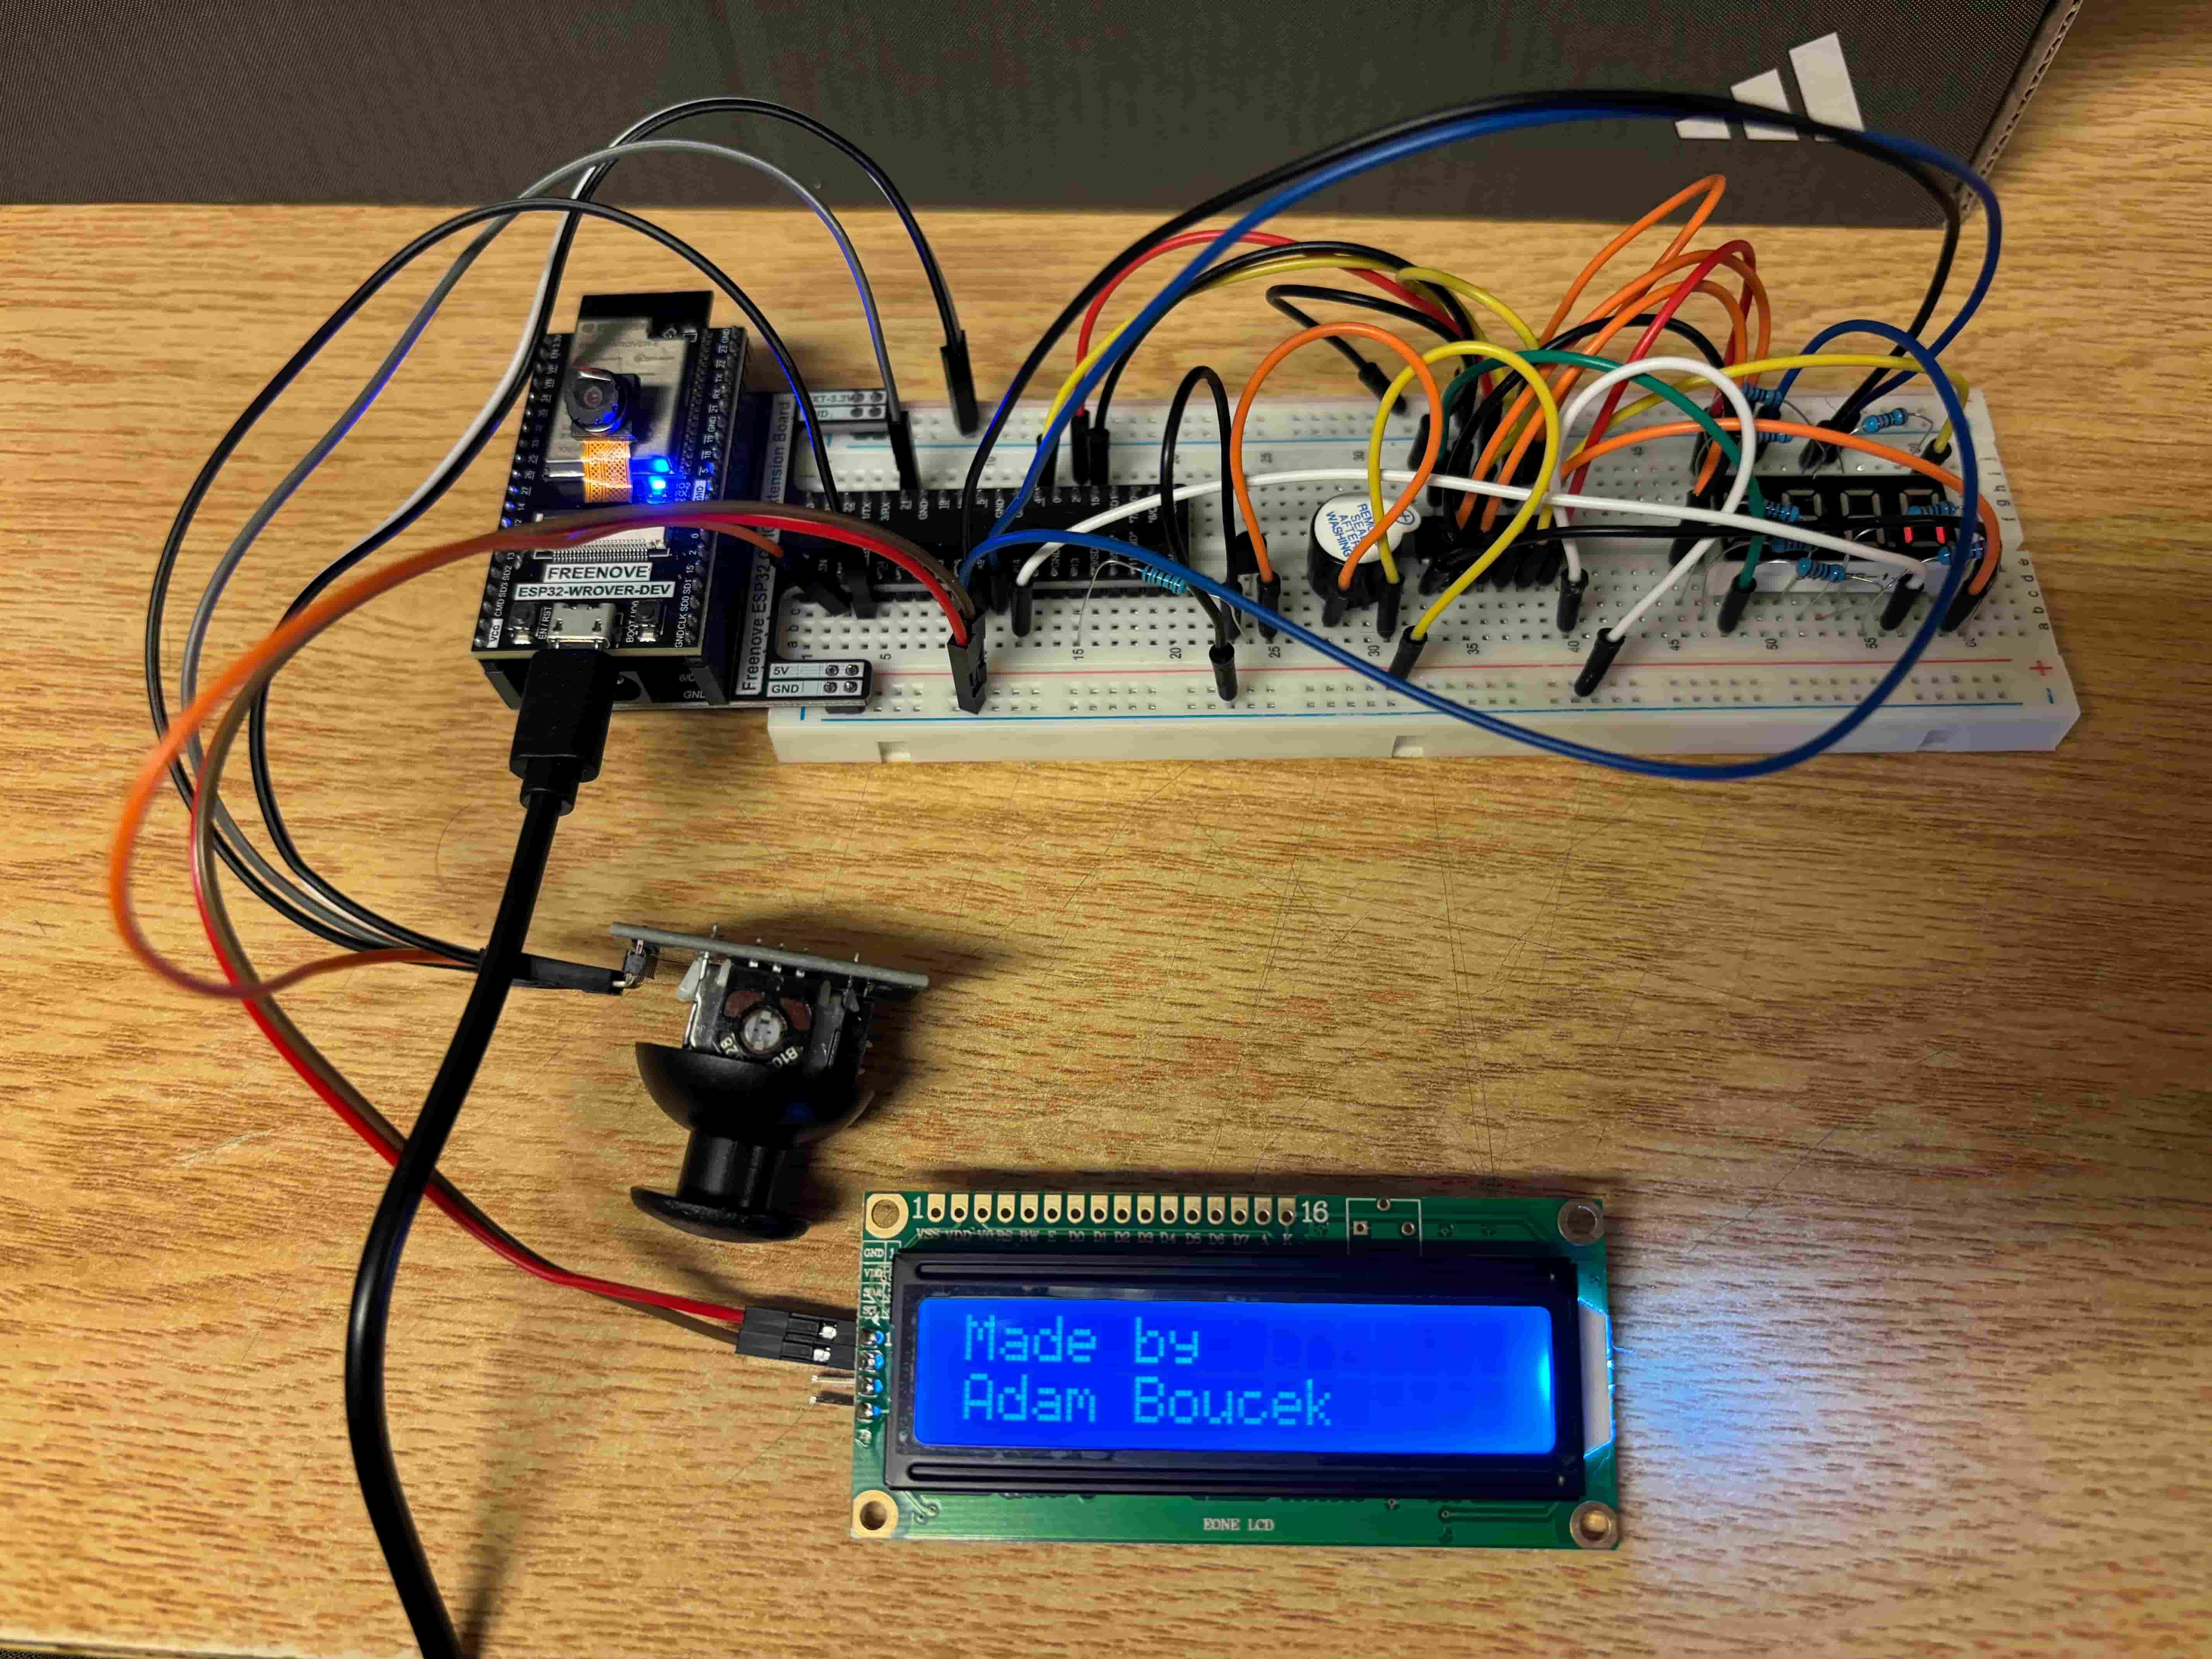
Joystick, 74HC595 & 7-Segment Display Schema:
Joystick, 74HC595 & 7-Segment Display Breadboard View:

Source Code:
project-1.py
from machine import ADC,Pin
import time

xVal=ADC(Pin(36))
yVal=ADC(Pin(39))
zVal=Pin(21,Pin.IN,Pin.PULL_UP)

xVal.atten(ADC.ATTN_11DB)
yVal.atten(ADC.ATTN_11DB)
xVal.width(ADC.WIDTH_12BIT)
yVal.width(ADC.WIDTH_12BIT)

# used a class from Freenove Ultimate kit ESP32 tutorial 16.1
class Chip74HC595(object):
    def __init__(self, ds: int=14, stcp: int=12, shcp: int=13, oe: int=5):
        self._ds = Pin(ds, Pin.OUT, value=0)
        self._shcp = Pin(shcp, Pin.OUT, value=0)
        self._stcp = Pin(stcp, Pin.OUT, value=0)
        self._oe = Pin(oe, Pin.OUT, value=0)
        self.enable()

    def shiftOut(self,direction,data):
        self._shcp.on()
        self._stcp.on()
        if direction:
            for i in range(8):
                bit=data<<i
                bit=bit&0x80
                if bit==0x80:
                    self._ds.on()
                else:
                    self._ds.off()
                self._shift_bit()
            self._send_data()
        if not direction:
            for i in range(8):
                bit=data>>i
                bit=bit&0x01
                if bit==0x01:
                    self._ds.on()
                else:
                    self._ds.off()
                self._shift_bit()
            self._send_data()

    def clear(self):
        for i in range(8):
            self._ds.off()
            self._shift_bit()
        self._send_data()
        self.enable()

    def _shift_bit(self):
        self._shcp.off()
        self._shcp.on()

    def _send_data(self):
        self._stcp.off()
        self._stcp.on()

    def disable(self):
        self._oe.on()

    def enable(self):
        self._oe.off()


comPin=[25,26,27,14]
num =[0xc0, 0xf9,0x8C, 0xa4, 0xb0, 0x99, 0x92, 0x82, 0xf8,
      0x80, 0x90, 0x88, 0x83, 0xc6, 0xa1, 0x86, 0x8e]

msgH=[ # message horizontal
    #      r    u    n    null
    [0xAF,0xE3,0xAB , 0xFF],
    #   null    r    u    n
    [0xFF, 0xAF,0xE3,0xAB],
    #   n    null    r    u
     [0xAB,0xFF, 0xAF,0xE3],
    #  u    n    null    r
    [0xE3,0xAB,0xFF, 0xAF],
    ]

msgV=[ # message vertical
    #      r    u    n    null
    [0xAF,0xE3,0xAB , 0xFF],
     #      r    u    n    null # top position
    [0xDE, 0x9D,0xDC,0xFF],
    #      r    u    n    null # bottom position
     [0xF7,0xFF, 0xF7,0xFF],
     #      r    u    n    null
    [0xAF,0xE3,0xAB , 0xFF],
    ]


def show_open():
     #      O    P   E    n
    msg=[0xc0,0x8C,0x86,0xAB]
    for i in range(0,4):
        chns=Pin(comPin[i],Pin.OUT)
        chip.shiftOut(0,msg[i])
        chns.value(1)
        time.sleep_ms(1)
        chns.value(0)

def scroll_array(arr, shift_amount=1):
    shifted_array = arr[shift_amount:] + arr[:-shift_amount]
    return shifted_array


def show_run(msg):
    timeout = time.time()
    for i in range(len(msg)):
        timeout = time.time()
        while time.time() - timeout < 0.25:
            for j in range(0,4):
                chns=Pin(comPin[j],Pin.OUT)
                chip.shiftOut(0,msg[i][j])
                chns.value(1)
                time.sleep_ms(1)
                chns.value(0)

def show_run_R(msg):
    timeout = time.time()
    for i in reversed(range(len(msg))): # reversed order
        timeout = time.time()
        while time.time() - timeout < 0.25:
            for j in range(0,4):
                chns=Pin(comPin[j],Pin.OUT)
                chip.shiftOut(0,msg[i][j])
                chns.value(1)
                time.sleep_ms(1)
                chns.value(0)

def buzzer(iteration, length):
    for i in range(0,iteration):
        activeBuzzer.value(1)
        time.sleep_ms(length)
        activeBuzzer.value(0)
        time.sleep_ms(length)


activeBuzzer=Pin(13,Pin.OUT)

#Pin(15)-74hc595.ds, Pin(2)-74hc595.st_cp, Pin(4)-74hc595.sh_cp
chip = Chip74HC595(15,2,4)

while True:
    if zVal.value()==0: # press button
        show_open()
    if xVal.read()> 4000: # press right
        buzzer(1,100)
        show_run()
    if xVal.read()== 0: # press left
        buzzer(3,50)
        show_run_R(msgH)
    if yVal.read()> 4000: # press down
        buzzer(5,100)
        show_run_R(msgV)
    if yVal.read()== 0: # press up
        buzzer(5,50)
        show_run(msgV)
Youtube video ↓ (click on it)

Project 2 - LED Matrix and Buzzer
Date: 10/08/23
Instructions:
Design and construct a circuit that displays a short animation with some background music using two buttons, a buzzer, two of 74HC595, an LED matrix, and other necessary electronic components. When you press a button, the LED matrix starts to show an animation with some nice background music, which repeats continually. When you press the other button, both the animation and background music are paused. When the first button is pressed again, it restarts the animation with the music. Capture your settings and working circuit in photos and videos (the videos should include sound).
Parts:
- ESP32-WROVER x1
- GPIO Extension Board x1 (optional)
- Breadboard x1
- 74HC595 x1
- Jumper M/M x38
- LED Matrix x1
- NPN transistor x1
- Push buttons 2x
- Resistor 220Ω x8
- Resistor 1kΩ x4
- Resistor 10kΩ x1
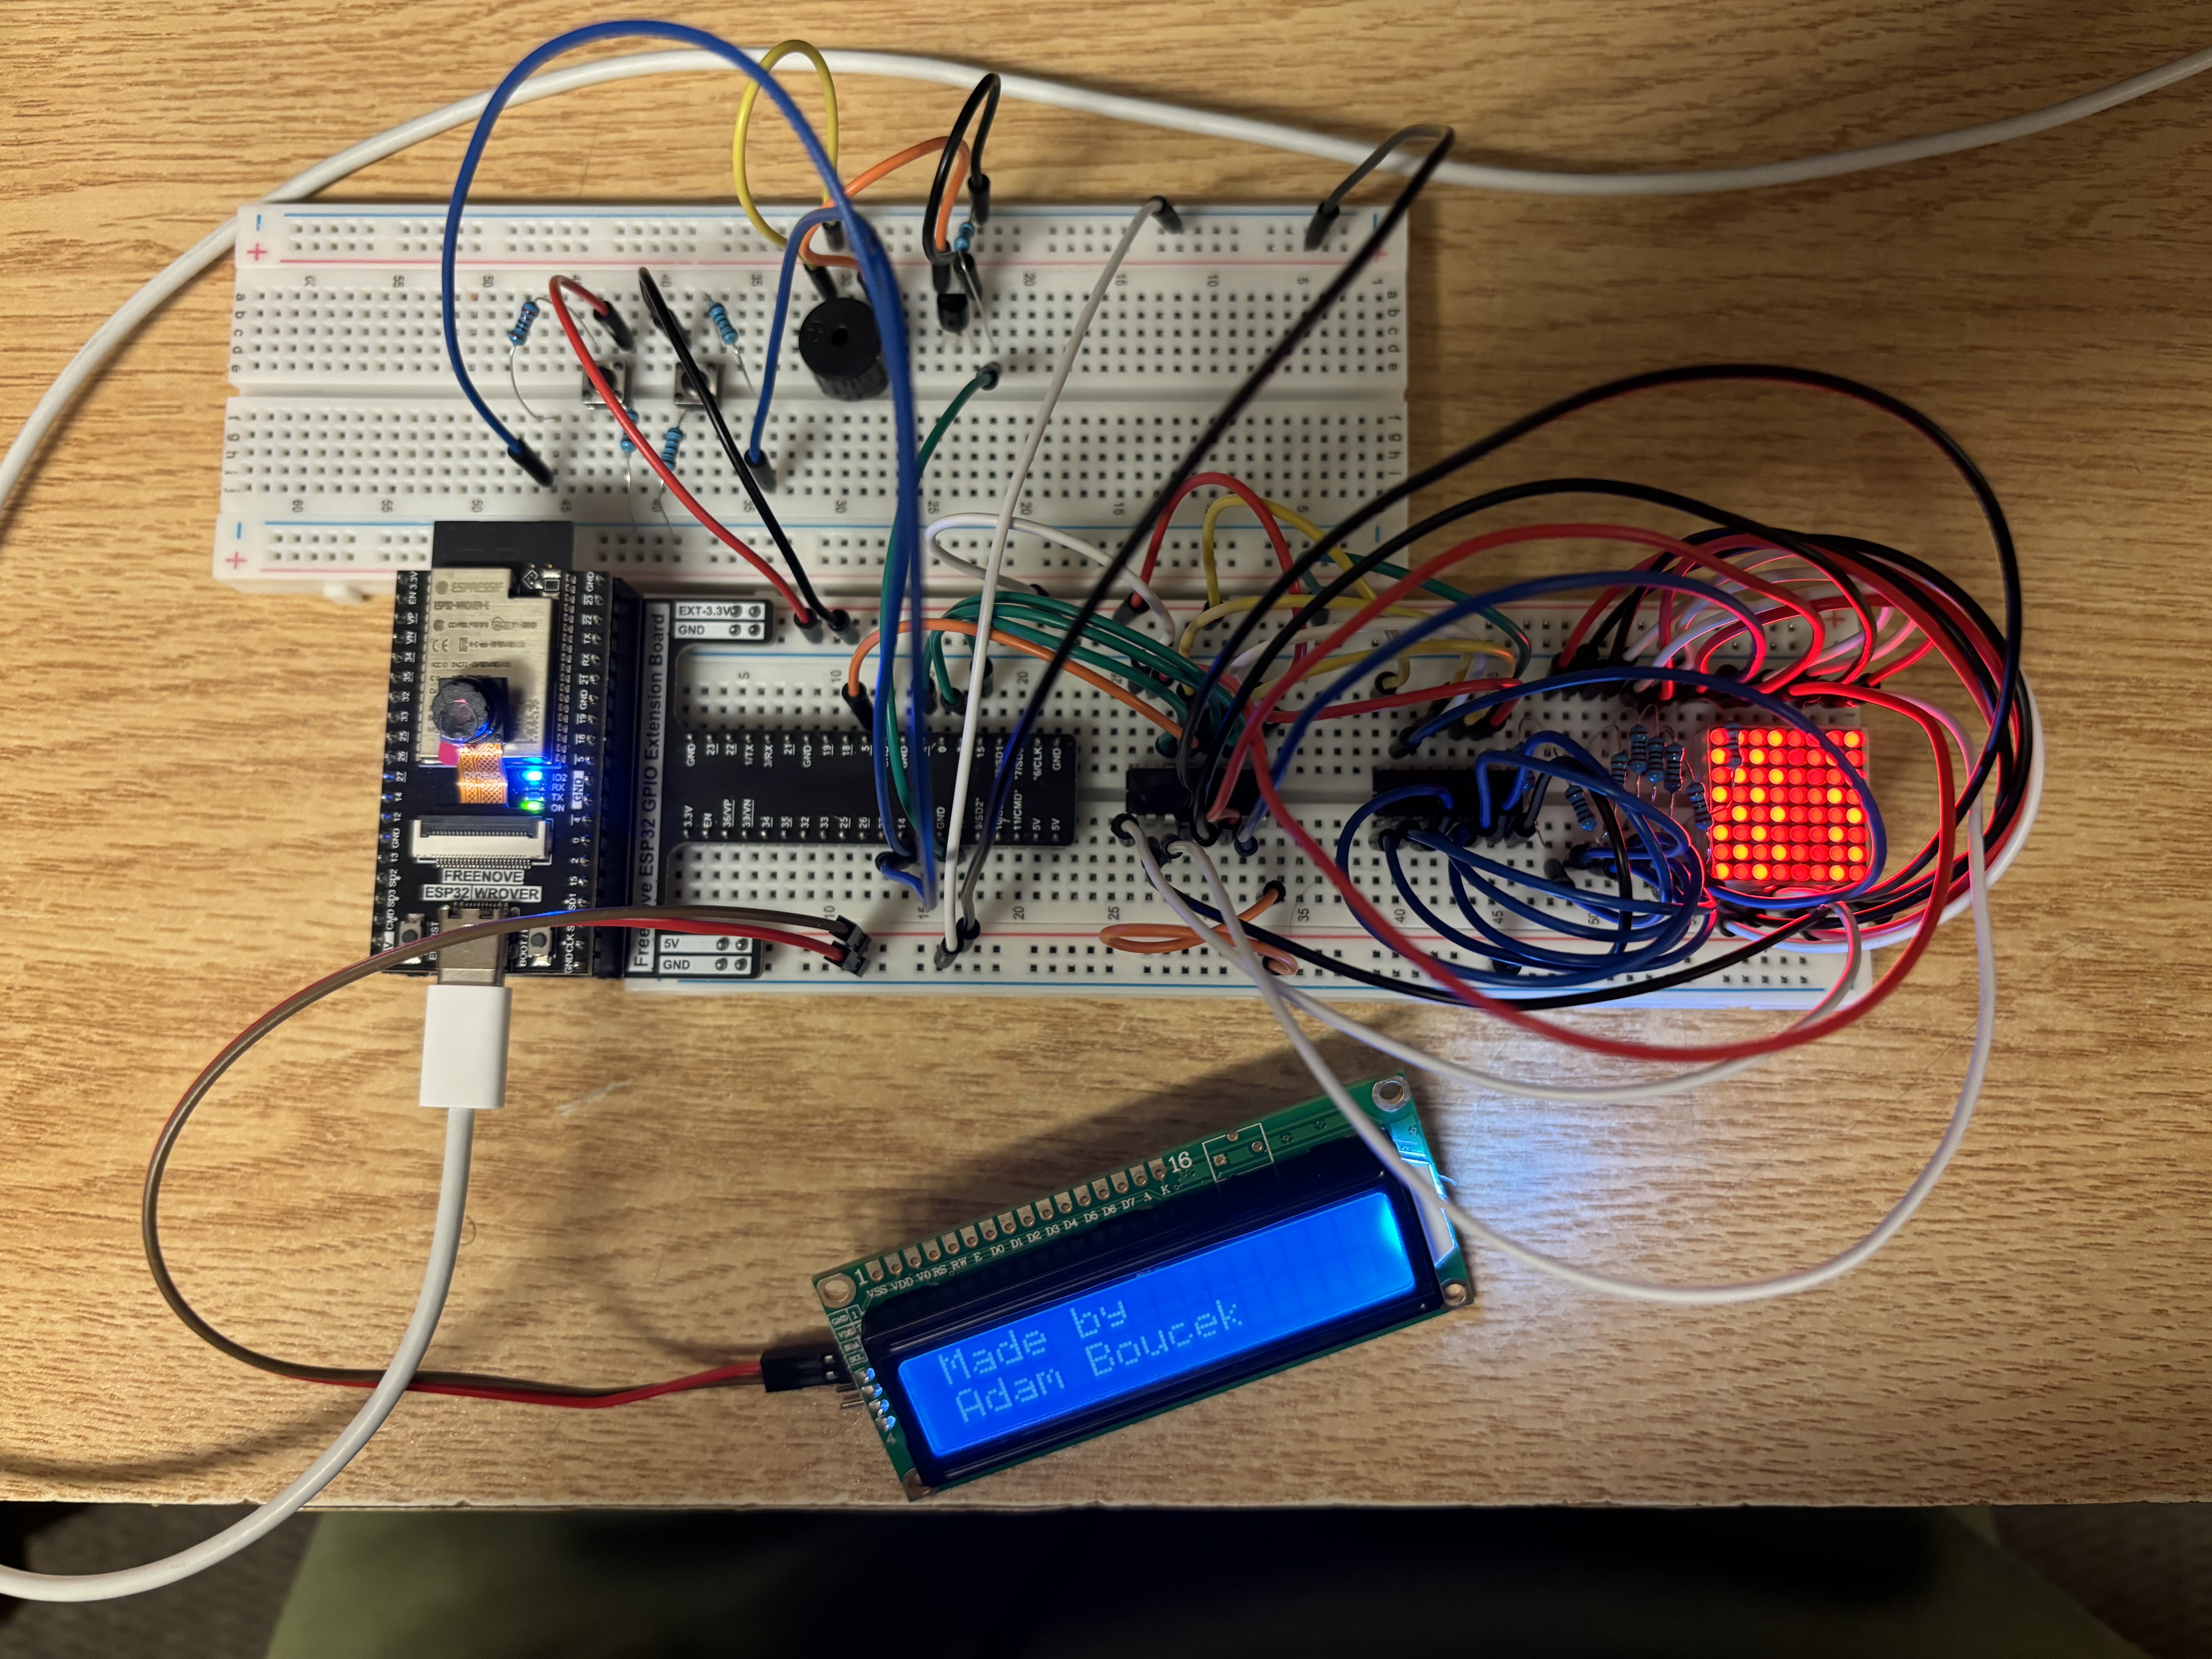
LED Matrix and Buzzer schema:
LED Matrix and Buzzer Breadboard View:
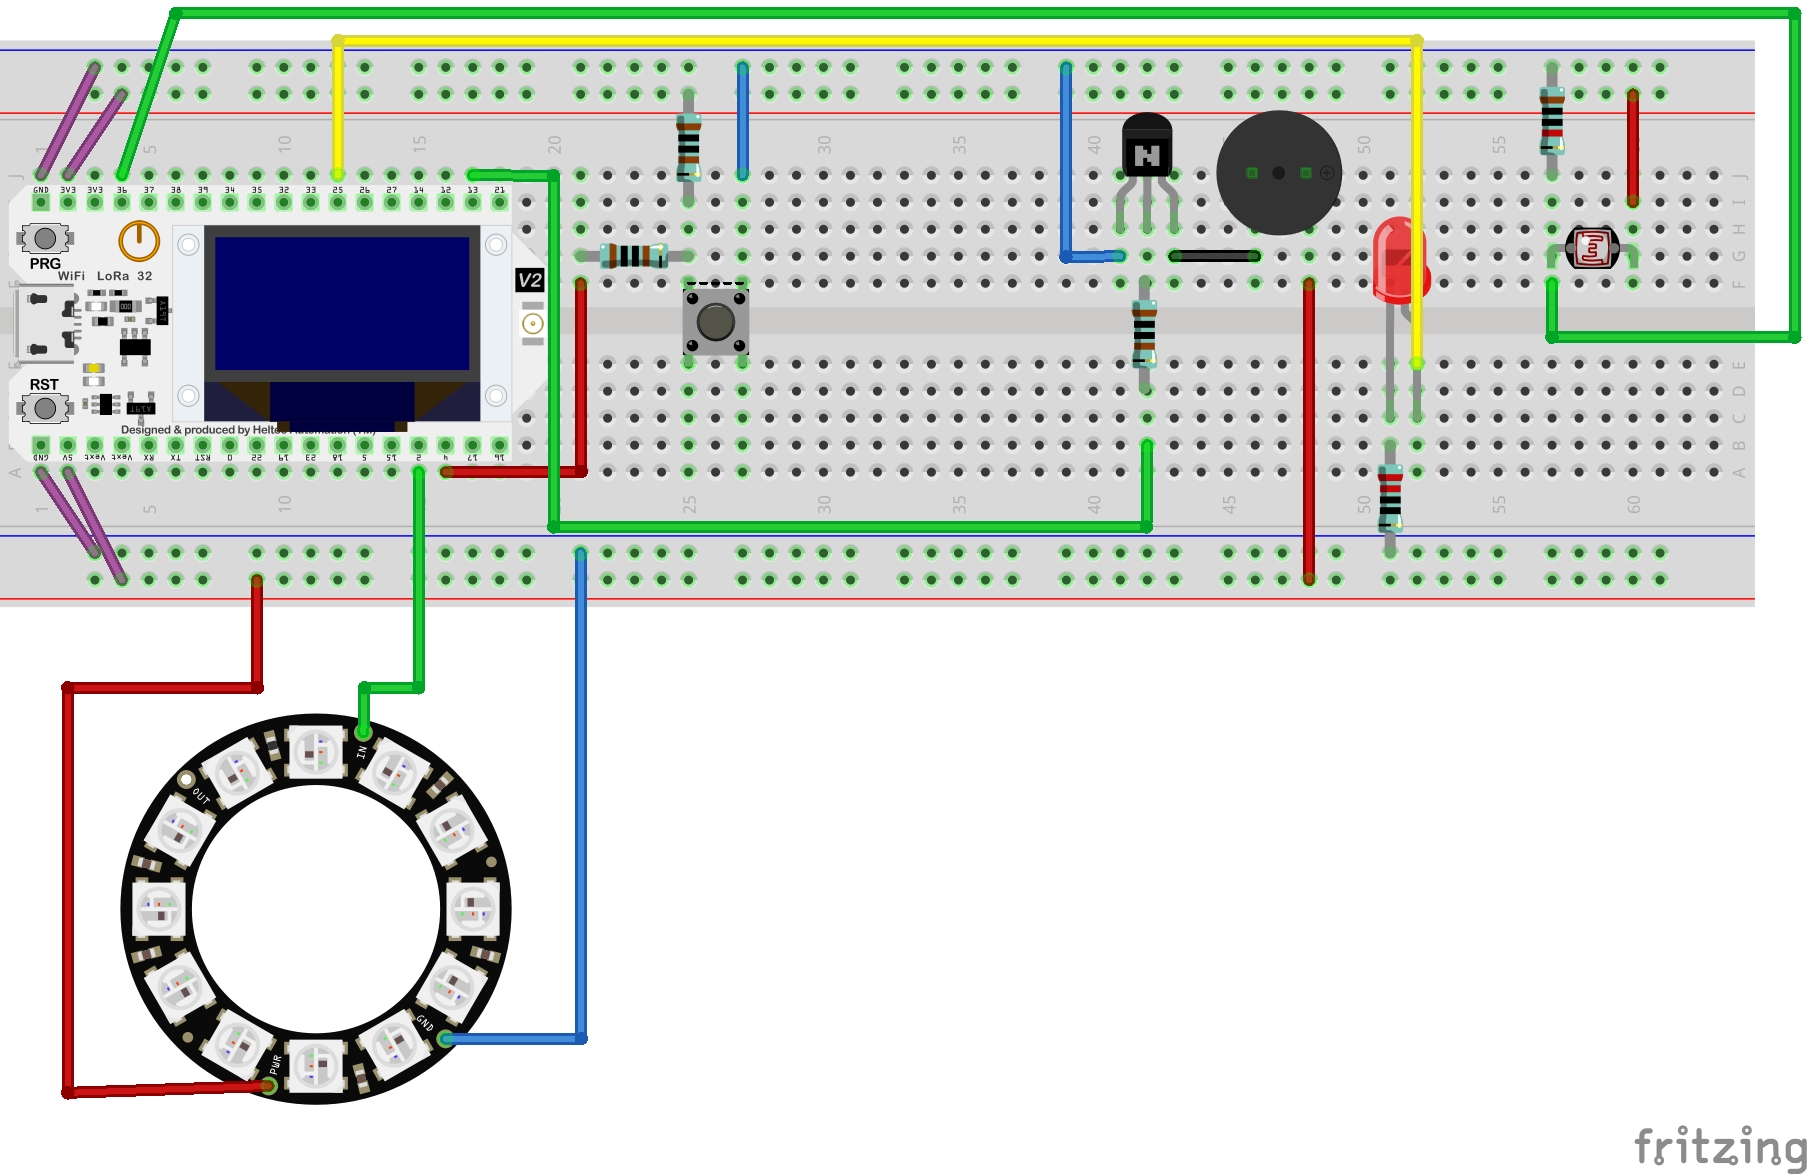
Note: Fritzing does not have NeoPixel Ring 8 RGB LEDs but it includes 12 LEDs ring. Please ignore this fact.
Source Code:
project-2.py
import time
from machine import Pin, PWM
import _thread

# used a class from Freenove Ultimate kit ESP32 tutorial 16.3
class Chip74HC595(object):
    def __init__(self, ds: int=14, stcp: int=12, shcp: int=13, oe: int=5):
        self._ds = Pin(ds, Pin.OUT, value=0)
        self._shcp = Pin(shcp, Pin.OUT, value=0)
        self._stcp = Pin(stcp, Pin.OUT, value=0)
        self._oe = Pin(oe, Pin.OUT, value=1)

    def shiftOut(self,direction,data):
        self._shcp.on()
        self._stcp.on()
        if direction:
            for i in range(8):
                bit=data<<i
                bit=bit&0x80
                if bit==0x80:
                    self._ds.on()
                else:
                    self._ds.off()
                self._shift_bit()
            self._send_data()
        if not direction:
            for i in range(8):
                bit=data>>i
                bit=bit&0x01
                if bit==0x01:
                    self._ds.on()
                else:
                    self._ds.off()
                self._shift_bit()
            self._send_data()

    def clear(self):
        for i in range(8):
            self._ds.off()
            self._shift_bit()
        self._send_data()
        self.enable()

    def _shift_bit(self):
        self._shcp.off()
        self._shcp.on()

    def _send_data(self):
        self._stcp.off()
        self._stcp.on()

    def enable(self):
        self._oe.on()

    def disable(self):
        self._oe.off()


# Defining note frequency
NOTE_C4 = 262
NOTE_D4 = 294
NOTE_E4 = 330
NOTE_F4 = 349
NOTE_G4 = 392
NOTE_A4 = 440
NOTE_B4 = 494
NOTE_C5 = 523
NOTE_D5 = 587
NOTE_E5 = 659
NOTE_F5 = 698
NOTE_G5 = 784
NOTE_A5 = 880
NOTE_B5 = 988


# Notes for "Mary Had a Little Lamb"
maryNotes = [
    NOTE_E4, NOTE_D4, NOTE_C4, NOTE_D4, NOTE_E4, NOTE_E4, NOTE_E4,
    NOTE_D4, NOTE_D4, NOTE_D4, NOTE_E4, NOTE_E4, NOTE_E4,
    NOTE_E4, NOTE_D4, NOTE_C4, NOTE_D4, NOTE_E4, NOTE_E4, NOTE_E4,
    NOTE_E4, NOTE_D4, NOTE_D4, NOTE_E4, NOTE_D4, NOTE_C4
]

ballon=[
    [0x00, 0x00, 0x00, 0x18, 0x18, 0x00, 0x00, 0x00], # . 0001 1000 = 18
    [0x00, 0x00, 0x3C, 0x24, 0x24, 0x3C, 0x00, 0x00], # o 0011 1100 = 3C & 0010 0100 = 24
    [0x00, 0x7E, 0x42, 0x42, 0x42, 0x42, 0x7E, 0x00], # O 0111 1110 = 7E & 0100 0010 = 42
    [0xFF, 0x81, 0x81, 0x81, 0x81, 0x81, 0x81, 0xFF], # O 1111 1111 = FF & 1000 0001 = 81
    [0xAA, 0x55, 0xAA, 0x55, 0xAA, 0x55, 0xAA, 0x55], # * 1010 1010 = AA & 0101 01010 = 55  => explosion
    ]


buttonOff = Pin(12, Pin.IN, Pin.PULL_UP)
buttonOn = Pin(14, Pin.IN, Pin.PULL_UP)
passiveBuzzer = PWM(Pin(13), 2000)
chip = Chip74HC595(15,2,4,5)

def playSong():
    global buttonOff
    for i in range(len(maryNotes)):
        passiveBuzzer.freq(maryNotes[i])
        time.sleep_ms(200)
        if not buttonOff.value():
            return
    passiveBuzzer.deinit()
    time.sleep_ms(200)

def displayBallonWithSong():
    # play song
    second_thread = _thread.start_new_thread(playSong, ())

    # display animation
    for k in range(len(ballon)):
    #             time.sleep_ms(500)
        if not buttonOff.value():
            return
        for j in range(100):
            cols=0x01
            for i in range(8):
                chip.disable()
                chip.shiftOut(1,ballon[k][i])
                chip.shiftOut(1,~cols)
                time.sleep_us(50)
                cols<<=1
                chip.enable()

try:
    while True:
        if not buttonOn.value():
            while buttonOff.value():
                passiveBuzzer.init()
                displayBallonWithSong()

        passiveBuzzer.deinit()

except:
    passiveBuzzer.deinit()
Youtube video ↓ (click on it)
